Switching Machines
The place where I work, b5media, is a business built on WordPress, which is based on the LAMP stack (where the “P” means “PHP”). Although my formal job title at b5 is “Technical Project Manager” and not “Developer”, the job titles aren’t rigidly defined, and I’d like to contribute my own developer skills at some point. Furthermore, I think that if you manage developers, you really should have some development skills and keep them sharp.
My preferred LAMP development platform is Mac OS X, which I feel delivers the best of both worlds: the functionality of a Unix-y operating system and the user experience — and dare I say, tasteful design — for which Apple is known and loved. In my former life at Tucows, I used my own PowerBook G4 as my primary machine, which is now my wife’s. Later, when I went to TSOT, they provided me with a 15″ MacBook Pro. When I left TSOT to join b5, the machine waiting for me was a Toshiba P200. For the first time since early 2003, my primary work machine was a PC running Vista.
It is possible to get work done in Vista, using it as a LAMP development machine feels a little awkward. While I’ve had no trouble setting up PHP under previous versions of IIS (in fact, I think my no-longer-existent docs for doing so on a Tucows site are pretty good), I have yet to successfully do it on the current version. I’ve had some success with installable LAMP stacks like Bitnami and WAMP, but somehow they still felt clunky. I also kept typing Unix commands at the DOS command line.
What I needed was a Unix I could run on my Toshiba.
A First Attempt at Ubuntu: Gutsy Gibbon
Installing Ubuntu on a desktop machine, even a “white label” one built in the dingy discount computer shop with lots of off-brand peripherals hanging on the walls, generally runs without a hitch. Getting Ubuntu to work on a laptop has typically been a completely different matter: there are generally incompatibilities galore and you have to do a lot of yak shaving in order to get a working system.
I first tried to install Ubuntu 7.10, a.k.a. “Gutsy Gibbon”, on the Toshiba. My experiences:
- The video card worked, although it wouldn’t go to the maximum resolution (1440 by 900) without installing
xserver-xorg-video-intel 2.1.9.94, which is explained here. - Sound didn’t work in the beginning, but once again, a little Googling found the fix. Since I use Skype voice chat in regular meetings with remote b5 developers, working audio is important. One downside: the speakers output audio even though headphones were plugged in.
- The webcam and card reader didn’t work at all. These weren’t dealbreakers, but they were annoying.
- My model doesn’t have it, but some versions of the Toshiba P200 come with a fingerprint reader. True to the stereotypes of the priorities of Linux people, the fingerprint reader is reported to work without any tweaking required.
I decided that I was doing more tweaking than working, so I decided to wait until Hardy Heron’s release, as it promised greater compatibility and a feature called “Wubi” that might meet my needs.
Installing Hardy Heron via Wubi
Wubi stands for Windows-based Ubuntu Installer that lets you install Ubuntu as if it were a Windows application. It doesn’t require any disk formatting or partitioning; the Ubuntu filesystem lives in a disk image within Windows’ filesystem. This setup allows Windows users to “try before they buy”, letting them take Ubuntu for a spin while still keeping their Windows applications and data.
Installation is dirt simple. You simply download the Wubi installer and double-click on it…
![]()
…which takes you to this window, where you enter just enough data to start the installation process:

You need only enter these six pieces of information to install Ubuntu using Wubi:
- The drive on which Ubuntu is to be installed
- The amount of disk space to allot to Ubuntu (up to a maximum of 30GB)
- Which desktop environment to use
- Which language to use
- A username
- A password
Once you’ve provided this information, click Install…and that’s it. The installer does the rest:

And soon afterwards, you’re greeted by this window, which prompts you to reboot your computer:

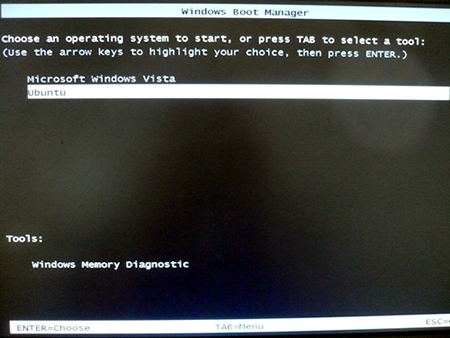
And soon afterwards, you’re greeted with this screen:

You’ll see this screen every time you boot up from now (or at least until you uninstall Wubi, which you do from within Windows; uninstalling Wubi is as simple as uninstalling any other Windows app).
Finally, you’ll see this:

I logged in and started checking to see if Ubuntu recognized devices on my laptop:
- Video: check! All resolutions right up to the maximum of 1440 by 900 were supported.
- Sound: check!
- Card reader: check!
- Wireless: check!
- Webcam: once I installed Skype, check!
- Volume dial: (It’s a hardware dial that sends volume-change messages to the system) check!
- Screen brighten/dim buttons: check!
I checked the filesystem and found that the Windows filesystem was accessible via the host directory, meaning that I could access any files on the Windows portion of the system. I set things up so that my home directory in Ubuntu had links to some of the folders in my user directory in Windows.
All in all, it was the least complex Linux installation experience I’ve ever had. If you’re a Windows user thinking about giving Linux a try, I highly recommend taking Wubi out for a spin.


